
So how did we play with embossing folders you ask?
Well....
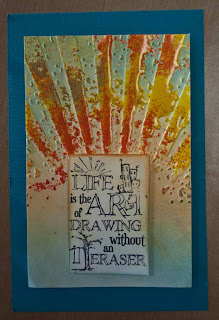
First I showed the gals how to use the Ranger Blending Tool and Distress Inks to create a background for cards. This is my "go to" embossing technique and I wanted to share it with the ladies. Together we created this card. (You may remember it from another post) The stamps are the Scrolls Work Stamps I have here in the studio. Love it

After our cards were created we played.
I showed the girls that if you added Distress Ink right on the flat side of the embossing folder and then embossed the paper you'd get a cool inked effect.

Then... conversely, if you add ink to the bumpy side of the embossing folder, you'd get a letterpress-like de-bossed effect.

Here's a better view of the whole de-bossing thing:

Add the two together and you can create some funky backgrounds

BUT... be careful when you de-boss. De-bossing will create a mirrored effect. If there is a folder with writing on it that you'd like to use be prepared to see it print backwards *smile*
 I like that... but I know many of you don't. Just thought I'd give you the heads up *smile*
Next we embossed paper with the folders and then added embossing ink to it to heat emboss over it. I got this idea from a Blogger I admire (Linda Cain) and thought... yep -- this is fun. Here is the beginnings of a bookmark embossed with Gold UTEE. Love the gilded effect.

And Here is a little piece I created with Yellow, Tiger Lily and Gold UTEE.
It's all good. Finer images can be embossed with fine embossing powders too. Take time to play with it!! Here's a tip: Do not press your embossing ink onto the embossed card to ink it. You just want to add the ink to the top of the embossed image. I like to apply it lightly in a circular motion just to "kiss" the edges. ...Did I say lightly? *smile*
Now, Tim Holtz's new embossing folders by Sizzix are, I believe, a little deeper than other brands out there. Try running your Grungepaper through it!!!!

OMG -- LOVE that. Now picture embossing your Grungepaper before making Grunge Roses and layered flowers. Eeeekkkk.... Guess what I'll be doing in the studio this week! LOL
I have Tim Holtz's current folders in the studio now for $12.50/pkg. Each package contains two embossing folders. Come and check them out and PLAY
Have FUN!
1 comment:
I had oodles of fun. Can't wait until September!
Post a Comment