Thursday, May 05, 2016

Retail Store Closing - May 27


Yes, it's true...  I decided to close the retail store in Cambridge this month.   Just put up the sign! ;)

I know this is a very sad thing for many people but please know that this is happening because of some very exciting things for me -- more travel and time to concentrate on my commissions, design and work with the Creative Scrapbooker Magazine.

So........   although the store is closing, I am not really going anywhere.

The website, although being restructured, will remain open, I will still be broadcasting (after a summer hiatus) on USTREAM and will have more time to record some edited instructional videos on youtube as well!   Also, look for me at local events and workshops...   I'll be teaching at some of those events too!   Super excited about that.

In the mean time, please follow the Art House Studio on facebook, twitter  and instagram for updates and information on my work and what I'm up to now.


Creatively yours,


Monday, April 04, 2016

THIS WEEK at the studio

Hi Everyone!!
Just need to update you on what's happening this week at the studio.

Because of ScrapFest in Kitchener this weekend -- the studio will be
CLOSING WEDNESDAY at 3pm for the week.

We will re-open next Tuesday April 12 for our regular studio hours.
Sorry for any inconvenience.

Looking for something creative to do this week?


I will be teaching a Brother ScanNCut workshop at ARTWAVES in Toronto on Wednesday morning during their business education day.   ArtWaves classes and show floor is open this weekend.  Decorative painters and mixed media people will enjoy this show!  Be sure to check it out!! More information: c2cevents.ca


Friday April 8 and Saturday April 9th at the Kitchener Auditorium.   This is a Scrapbooker, Card Maker, Paper Crafter must!  Information: scrapfest.ca


Friday, March 18, 2016

Monoprint Collage Painting....


Thanks for joining me last night on USTRAM everyone -- even with all the technical issues!!   I was able to record enough of the stream to create this video.   Enjoy!!

Supplies used:
Assorted Monoprints created with the Gelli Plates
PPA - Perfect Paper Adhesive (USArtQuest)\
Perfect Pigment Paints: Green Pearl, Cobalt Turquoise Hue, Titanium White, Dark Violet (USArtQuest)
Phthalo Turquoise Fluid Acrylic Paint (Golden)
Shading Grey High Flow Acrylic Paint (Golden)
12x12 Wood Canvas


Thursday, February 25, 2016

As seen in the Creative Scrapbooker....

Come learn to rag quilt by creating this fun shopping tote here in the studio!   Choose from one of our in store selections of Quick Quilting Fabrics from FabScraps (blue, pink, red, black or turquoise) and we'll show you how it's done!


Workshop Fee:  $45/person (materials included)
Workshop Length: 3 hours

Bring your own sewing machine or try one of our fabulous Brother floor models (limited number available)

Friday, February 19, 2016

Using ArtFoamies

I had a lot of fun last night on USTREAM playing with the new ArtFoamies stamps that arrived in the studio recently.  LOVE these stamps!!   The detail is fabulous!

After I stopped the ustream recording, I stamped a Wine Gift Bag ...  today I added some foil accents to it and I wanted to show you how I did that!!    ENJOY


Tuesday, February 09, 2016

It's my turn again!!

Over on the Creative Scrapbooker Blog you'll find my Tuesday With The Team blog post today

I shared a Valentines Card I created with the Brother ScanNCut machine (using both Draw and Cut features) and our new DecoFoils (Foils and Peel N Stick Toner sheets).   Love how this turned out...  AND...  I have to say, I have become a convert on using the DRAW feature on the ScanNCut for card making!!   In lieu of stamping sentiments, this is the PERFECT way to customize your greeting without having to use your own handwriting.   *heavens part, angels sing*   giggles

Those of you with eagle eyes might notice that the coloured paper behind the scalloped heart is one of the Gelli Prints I made on USTREAM last Thursday night.  I knew it wouldn't take long for me to use those!!

Find out more on the Creative Scrapbooker Blog...  hope you check it out!   And don't forget to leave a comment.

Thursday, February 04, 2016

Decorative Rollers and Gelli Plates... oh MY!!!


I had a fabulous time playing with our new Decorative Art Rollers on USTREAM tonight.  LOVE LOVE LOVE how the prints turned out.   These are single prints above....  Single Prints!!  "It's like using a stencil. mask and stamp at the same time!" - Kathy Arbour.   Seriously!!   Super fun!

Here a link to the unedited LIVE broadcast.   Hope you enjoy watching!!...   off to buy more rollers!!  HAHA

Live streaming video by Ustream


Wednesday, January 27, 2016

Loving these Enamels!


I picked up a fun bowl (from the Clearance Section of all places) on my trip to Buffalo last week.  Loved it but it was begging for some colour.   I brought some of Susan Lenart Kazmer's ICED ENAMELS to the studio this month and thought these would be PERFECT to embellish it!   Loving how this is turning out so far...   here's what I've done:

I Painted the white rosettes that rimmed the bowl with the Enamel Medium and a small brush.  Although I covered most of the flower buds with the medium, I purposely didn't worry about covering the whole thing - I didn't want to have a solid coat of enamel.  I wanted some some of the original white to show through. Note: I worked three rosettes at a time.

After the medium is applied, I poured the enamel powder (Raspberry) over the rosettes being sure to have a tray to catch the extra powder that didn't stick to the medium.

Then simply heat to melt the enamel with your heat gun

Once the enamel was set, I re-painted highlight sections of all the roses and sprinkled some Chartreuse Enamel on it..  the re-set with my heat gun

I did add some foil accents to them too -- I did this with by painting highlight areas with DUO adhesive and then pressing the foil sheets into the sticky to apply.   

I'm thinking I need some more enameling...   so let's consider this a work in progress.  *smile*
Have a creative day!!!

Vlog - Jan 26 .... They're Here!!!


Sunday, January 24, 2016

Creating for Haiti


Saturday March 5, 2016
10am - 6pm

$45 includes lunch and a $30 donation to Creative Scrapbooker and Live Different's Hope for Haiti Initiative to build an art room for a school in that country!!

All crafter's welcome - Scrapbookers, cardmakers, crocheters, sewers...  it's all good! I will guide you through creating a mixed media Hope for Haiti flag to send to the children in Haiti too!  LIMITED SPACE AVAILABLE so please reserve your crafting area with me as soon as possible.


Saturday, January 23, 2016

Join us for a NEW CLASS offered by Karen Egoff


Meditation Doodling 
with Guest Instructor: Karen Egoff.
Saturday February 13, 2016
10:30 - noon
In this interactive class, we will start with a guided Meditation to help us relax and open us to create art, in a freestyle Mandela work shop. Let yourself go and let your natural, innate abilities come to life.
$25 (plus hst) Supplies included
Karen Egoff is an internationally respected Reiki Master, Teacher and Practitioner. In addition to the incredible Healing Energy she manifests through Reiki, she is also a very accomplished Cranial-Sacral Practitioner, a technique she incorporates into most of her Client's Sessions, with Reiki. She is a dedicated and supportive lady who believes in natural ways to connect one back to well being.
In addition to Karen's Energy Work, she has been Teaching and Practicing Yoga and Meditation for 25+ Years. She continues working with both of these modalities, including recently developing a Chakra Meditation Series covering the Seven Major Chakras. Karen teaches her classes and does treatments and group meditation sessions along with Yoga at retreats in North America.
Hope you can join us! If you're interested, please feel free to contact the studio to reserve your space. 519 267 6620


Tuesday, January 19, 2016

Saturday, January 16, 2016

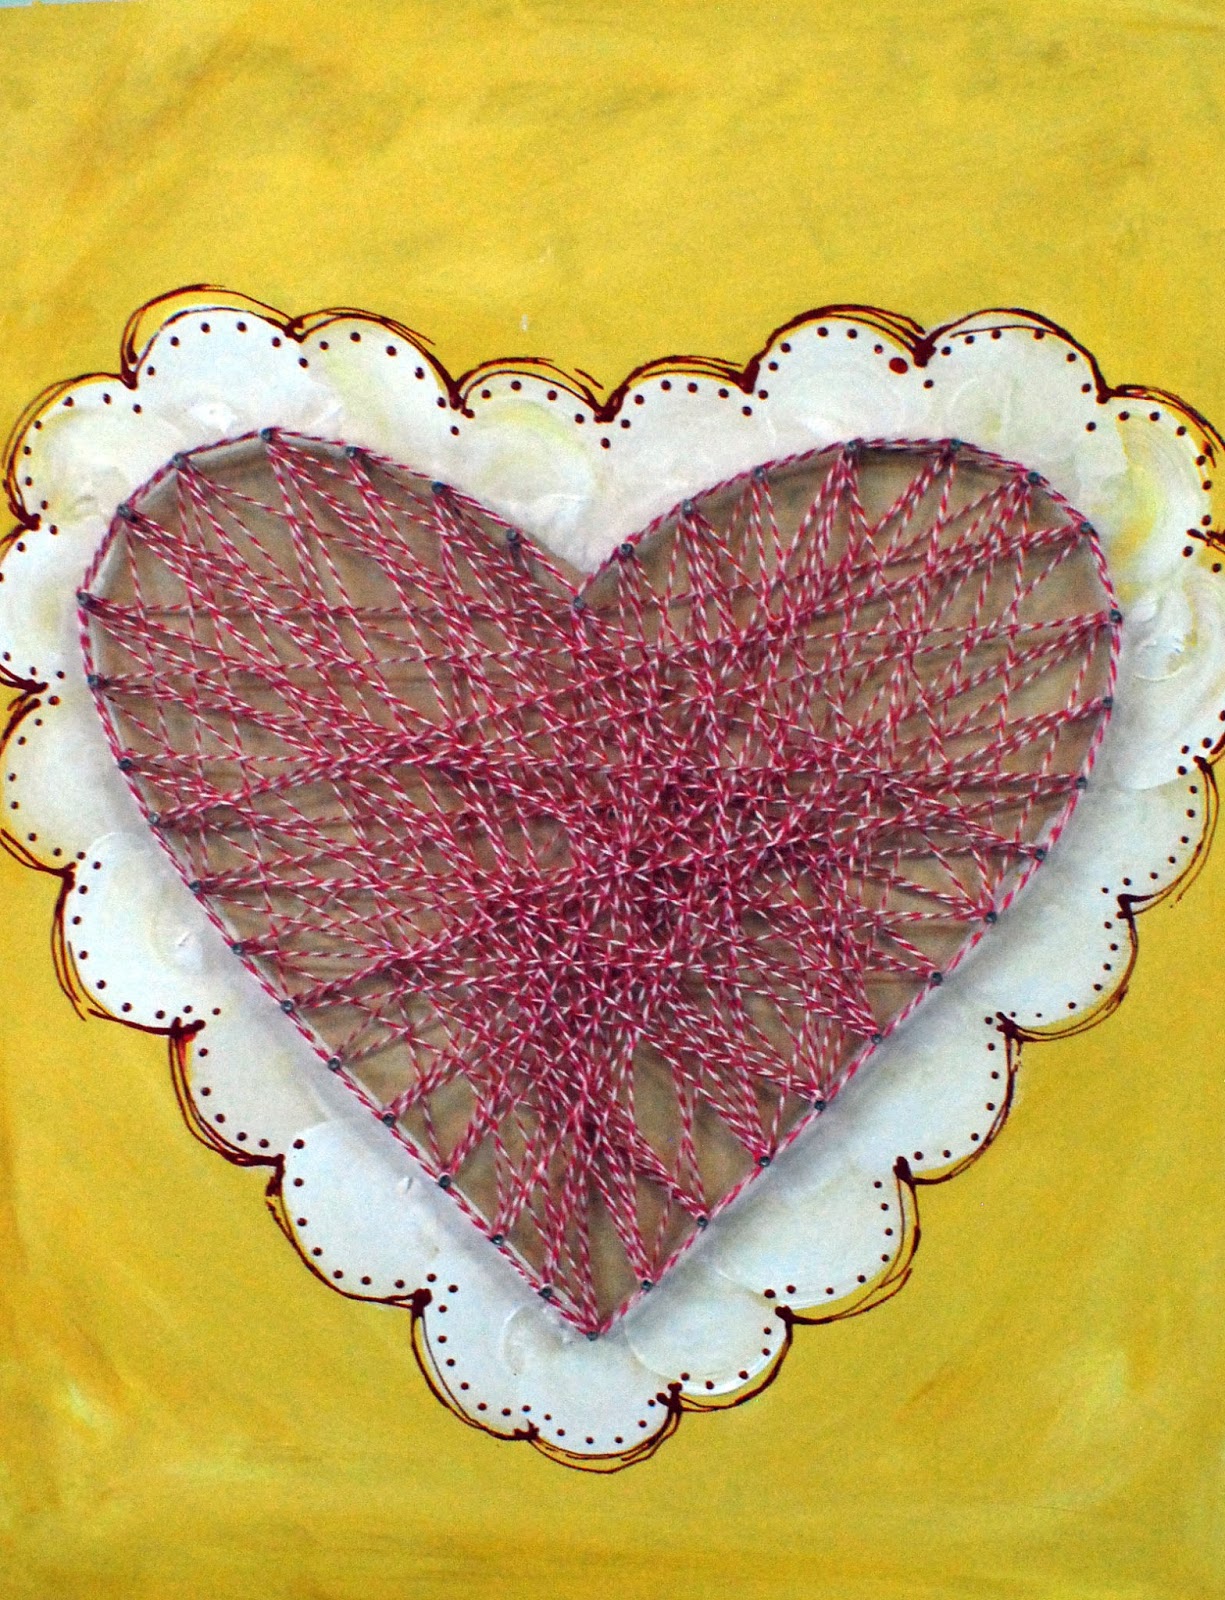
String Art

Yes, welcome back to 70s crafting everyone!!   The CHA show floor wa FULL of String Art, Looming and Macrame!   I sure did make me giggle...   BUT -- LOOK!   I certainly had to create something featuring it too! *wink*

Banner Version
I created this String art Heart as a feature image for my store window banners.    I absolutely LOVE how it turned out.   I simply sketched a heart shape on my wood canvas and hammered nails (relatively) evenly around the shape and went to town stringing my baker's twine.   Love the randomness of this...  a little more of a modern take.   I just love it!

Hope you're having a creative weekend!   More trend posts to come!   Happy 2016!


Thursday, December 24, 2015

Merry Christmas

Wishing you a safe,  happy,  creative Christmas surrounded by the people you love.

See you back in the studio on Tuesday.
Merry Christmas.

Wednesday, December 23, 2015

Fun Fabric Ornaments with the Brother ScanNCut


I love making little gifts this time of year.  You'll often find me crafting away right before the holidays to create a little something extra to attach to presents, etc.   This year I made some FUN stuffed canvas ornaments.    Super fun and easy with the help of my Brother ScanNCut and Sewing Machine.

Here's what you'll need to create an ornament:

6"x12" piece of Canvas or Heavy Muslin
4"  scrap of a Pattern Material
Letter Stamps and Archival Ink (Jet Black)
Some Fusible Webbing and an Iron
Ribbon
Matching/Coordinating Thread
Stuffing

ScanNCut Machine and Sewing Machine

I chose to cut out one of the ornaments already programmed into the machine but you can also make your own with one of the pre-programmed shapes.


  • When you cut fabric, you need to make sure you iron a fusible webbing to the back of the fabric so it will cut cleanly.   If you're using a heavy interfacing, you can cut the fabric face side up -- if you're using a light weight interfacing, be sure to cut the material face side down.
  • Cut 2 canvas pieces the size you'd like for your ornament and then cut 1 shape re-sized 3/4 smaller than the original out of the patterned fabric.
  • Stamp a Christmas sentiment onto a scrap of the fused canvas with the Archival Ink and attach to the printed material.  Sew in place.
  • With wrong sides facing, stitch around the 2 ornament pieces (I love free-motion stitching these) leaving a space about an inch wide so you can stuff the ornament with the cotton batting. The ornament pictured above has a loop to attach a string to so I fused this together first and left the opening at the bottom.  If yours doesn't, be sure to attach a piece of ribbon to the wrong side of the fabric before sewing.
  • Stuff the ornament and then stitch it closed.
  • Embellish with a ribbon bow and you're done.  HO HO ... HO  (anyone get the reference? *wink*)
Have a Merry Christmas and hope to see you in the studio soon!!!  Happy Crafting!

Sunday, December 20, 2015

Working the Leia Buns.....


I had some yarn left over from my little tacky sweater adventure with the Crochet Crowd so I thought I'd make myself some "Leia buns" to wear to Star Wars VII last night.    I've seen this done before but this video by Mark Montano gave me the kick in the pants to do it too....  Next time??   I'll be sure to have more yarn on hand to make BIGGER Buns -- BUT ...   there was just enough to make my little homage.  Giggles


Where are my buns now? The kid took them home with her to show them to her roommates.  Even the hubby wore them for a while - I'd say they were a hit!!  Perhaps next time I'll try the Wookie paws! *wink*

TIP - I used some of our Adhesive Backed Felt to stick to the plastic headband and to wrap the finished yarn braids on.   Worked perfectly and much less messy!!!   ...and I used the Brother ScanNCut to create perfectly sized cut circles.  The felt cut BEAUTIFULLY!!!   Yippee!

Have a creative weekend everyone!

Saturday, December 19, 2015

Holy Smokeage!   I have been blog delinquent this month.   Many apologies!  
There has been a lot happening at the studio - people joining us to paint, stock coming in (and out) for the holidays and I even had some special guests - Mikey and Diva Dan from The Crochet Crowd - here for a Holiday Sweater Party.   Loved being their guest!   Thanks guys!

Hope you've been having a great month creating!   I'll be sure to post our antics more regularly!  
Here's a laugh-tastic snippet from our LIVE on Facebook broadcast.  Enjoy


Thursday, November 19, 2015

ScanNCut for the Holidays

All ScanNCut Accessories are 15% off until December 18th!   
A Great time to stock up on Mats and more!

ALSO -- A GREAT DEAL on a ScanNCut 550
$100 off
Ask us for details!!


Tuesday, November 17, 2015

Hostess Gifts, thanks yous, wine... it's all good!

Be sure to head on over to the Canadian Scrapbooker Magazine blog today to see how I created these fun Wine Bottle Tags and Thank You Cards using the Brother ScanNCut Machine and some Speedball Carving Tools.

So much fun and perfect for the upcoming holiday season!


Thursday, November 12, 2015

We're participating in the Cambridge CLASH!


Bring in FOOD FOR THE CAMBRIDGE SELF HELP FOOD BANK until November 18th and receive 10%off your purchases in the studio. (excludes workshops and floor model Brother Sewing Machines)

Let's get together and support our community!