Showing posts with label Sizzix. Show all posts

Friday, March 11, 2011

One Caged Birdie....

So, this week I felted, painted, embossed, waxed, sprayed and now..... I had an urge to use WIRE!!

I've been eyeing some fabulous creations in my Somerset Magazines for a while now that used crude bird cages to showcase their art. This is what I came up with (for now.....)

Armed with some NEW "ART PARTS" by Wendy Vecchi, I decided now was the time to try my hand at cage making.
The Cake Stand went together perfectly! So nice to use -- I collaged some 7 Gypsies and Graphic 45 Papers to it and set to work on the cage.

The cage was easy peasy!! I used some very moldable armature wire and created the shape with my hands. No pliers required. The wire was fused together with some Memory Foil Tape from Ranger -- you know, the stuff that you can "solder" their Memory Glass together with if you don't want to use one of their frames.... Anyway -- LOVE how it turned out BUT not as much as I LOVED how the flower embellishment took shape. Check it out!

To create this I took some of the new Aluminum Sheets I got in the Studio from MercArt and attached them to a sheet of "Clearly for Art" I NEW MODELING FILM also from Wendy Vecchi's Art Parts line. This stuff is sooooo cool! Just heat it and mold it - when it cools (in a few seconds) it will remain in the shape you placed it. ....Don't like where you placed it? no problem, just re-heat it and it will go back to its original shape. Did I mention that it was cool?

Anyway, I took the aluminum sheets, embossed them with some texture fades and attached them using my Xyron. Heated it. Shaped it and voila!! LOVE IT!!!!

I love the centres too -- cause I've been felting remember? *smile*. You guessed it! I felted a small green puff and hand stitched some small beads to it. A little 3 in 1 Glue and I have one heck of a flower embellishment! What could be better?

For you bird lovers out there -- my bird in the cage was a die cut from one of Sizzix new dies.
I cut him/her out of chipboard (cause you can when you use a sizzix) and then attached some BG papers to it -- don't forget the feather.

I hope you like! Phew! I've been up to a lot lately! All of these projects will be taken to ScrapFest as samples. I hope you are planning to attend and drop by the studio booth to see them in person!). Wait until you see what I have up my sleeve for tomorrow! Yes, the sewing machine has been out this week too!

Have a creative day!

Saturday, December 11, 2010

Too Much Excitement ...

Tag Number 11 today... I created it after a very fun Wax Class with some ladies -- we did the last of the "leaves" class today as the snow has started to fall and leaves are getting far too scarce. Oh well ... Hope the girls enjoyed the last of the leaves of the season -- and playing in the wax too, of course!! *smile*

This tag was fun!! Some of you might recognise the "make your own stamp" technique that Tim taught today -- I used that technique at ScrapFest Oshawa's Crop Room Make in Take. IN FACT, Cheryl Sue used the stamp I gave them for that make in take in her variation of Tim's Tag #1 ... I thought that was sooooo cool!! Anyhoo, I digress :)

I didn't make my own stamp here .. I did use one of Claudine Hellmuth's Foam Stamp Sets instead. I love the one boarder stamp that I believe is in the Doodles Pack -- I really must check that out ... I think it works well here. The Trees were from that Seasonal Grunge Set that used before (and that has come in VERY handy this year) I embossed with Distress Embossing Powder and, instead of Flocking, I used Ranger's white embossing Puffs for the snow. Did the trick ..

Hope you like the tag cause it almost didn't happen today -- I got locked out of my back room -- THANKS WANDA!!hehe We had to break into it -- I am happy to report we must have all been good little girls in our youth because we couldn't pick the lock... even though Kelly just had to keep trying while I tried to take the pics out of the hinges....

Eureka!!! The pins came out okay.....


BUT... the door was wedged right in there... and I couldn't pry it open with my limited tools -- my tools are kept in the back room of course -- we did what we did with jewelry pliers and setting tools - OMG ... hysterical!!

So...... Amber went and got her hubby and his tools.... VOILA!!! He doesn't look as happy as I was to see that door give way! LOL
THANK MIKE!! I could get to the back room once again!!!!! And you saved the 11 Tag of Christmas ... and my bursting bladder!!! LOL
Hope you're all having a creative weekend!! One more tag to go .... Hopefully sans drama :)

Wednesday, December 08, 2010

Tag #8 - Masking and Stencling

Well... you know I love using my Distress Inks with Masks and Stencils!.
For this tag I used Heidi Swapp's 12x12 Mask/Stencil Star Set and I just love how it came out. Very whimsical. The detail in the star was created using Distress Inks and Crafter's Workshop Templates....

AND, I finally got to use the townscape edger die -- YAY ME!! I love that die -- anything houses really .. so here it is....

Simple, yet effective.
Have a fantastic day!! I'm off to clean out the back room, AGAIN!! blech! :)

Tuesday, December 07, 2010

Noel, Noel


Here is Tag #7 - a Sticky Back Canvas Poinsettia! Love it!

I pretty well followed Tim's directions this time ... BUT I did hand cut the flower pieces (I don't have my own tattered floral die - yet!) Hey, it let me have a bigger flower - it's all good in my mind.


Have a creative day everyone!

Sunday, October 31, 2010

Happy Halloween!


Happy October 31 -- I had plans to create something Halloweenie for you all today but that didn't work out BUT, if you come back tomorrow you'll see the new card workshop and later this week another getting ready for Christmas project. So... I hope you forgive the lack of Halloween goodness and have a treat out of the kiddie's bag tonight instead *wink*

I did want to share something that I saw this morning with you. I hope Eileen doesn't mind but I thought this was FABULOUS!!!! And completely share worthy.

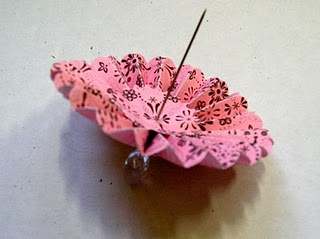
Eileen writes a creative blog that I follow. She's incredibly talented and has wonderful ideas to share. Today's entry Things to do with a Rosette Die on a Chilly Day is especially inspiring. Just look at what she's created using the Tim Holtz Sizzix Rosette Die (Yes, I did get a few back in to the studio). A decorative pin:
A funky bird embellishment:
A Paper Umbrella?

See.... told you it was totally share worthy!!
I hope you like my Halloween gift to you. THANKS Eileen!
Have a creative day everyone!!

Thursday, August 05, 2010

An Embossing Extravaganza

I had a lovely evening last night in the studio playing with embossing folders with the gals from the Technique of the Month Club. We welcomed some new members and I'm thinking as the popularity of this group grows... we'll have to add two classes a month starting in the fall -- SO if you are interested in coming out and playing with us every month, let me know. Love to have you here.

So how did we play with embossing folders you ask?

Well....
First I showed the gals how to use the Ranger Blending Tool and Distress Inks to create a background for cards. This is my "go to" embossing technique and I wanted to share it with the ladies. Together we created this card. (You may remember it from another post) The stamps are the Scrolls Work Stamps I have here in the studio. Love it


After our cards were created we played.

I showed the girls that if you added Distress Ink right on the flat side of the embossing folder and then embossed the paper you'd get a cool inked effect.
Then... conversely, if you add ink to the bumpy side of the embossing folder, you'd get a letterpress-like de-bossed effect.
Here's a better view of the whole de-bossing thing:
Add the two together and you can create some funky backgrounds
BUT... be careful when you de-boss. De-bossing will create a mirrored effect. If there is a folder with writing on it that you'd like to use be prepared to see it print backwards *smile*

I like that... but I know many of you don't. Just thought I'd give you the heads up *smile*
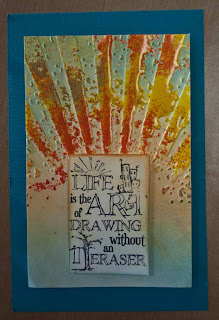
Next we embossed paper with the folders and then added embossing ink to it to heat emboss over it. I got this idea from a Blogger I admire (Linda Cain) and thought... yep -- this is fun. Here is the beginnings of a bookmark embossed with Gold UTEE. Love the gilded effect.


And Here is a little piece I created with Yellow, Tiger Lily and Gold UTEE.

It's all good. Finer images can be embossed with fine embossing powders too. Take time to play with it!! Here's a tip: Do not press your embossing ink onto the embossed card to ink it. You just want to add the ink to the top of the embossed image. I like to apply it lightly in a circular motion just to "kiss" the edges. ...Did I say lightly? *smile*
Now, Tim Holtz's new embossing folders by Sizzix are, I believe, a little deeper than other brands out there. Try running your Grungepaper through it!!!!

OMG -- LOVE that. Now picture embossing your Grungepaper before making Grunge Roses and layered flowers. Eeeekkkk.... Guess what I'll be doing in the studio this week! LOL
I have Tim Holtz's current folders in the studio now for $12.50/pkg. Each package contains two embossing folders. Come and check them out and PLAY
Have FUN!

Wednesday, July 14, 2010

Some Girlie Time...


This weekend my dear friend Sheri came to the trailer to spend some much needed time away with me :) I was sooooooooooooooooooo excited to have her there!

Anyway -- true to form .... Sheri and I did a little crafting. One of the items I created was this vintage frame all decked out in GrungePaper Roses (youTube Tutorial coming soon). Still love my Grunge and the effect it gives. The roses were done using Wendy Vecchi's Dimensional Rose Art Stamp Images (the leaves were from that as well) and I used a Sizzix leaf flourish I had to create the Grunge Vines. Yummmmmmmmmmm... The Shaped cardstock in the middle of the frame was created with the new Tim Holtz Sizzix Shaper Die and the quote is one of his stamps!! I have it up at the studio now. Come on by to see it.

WHILE YOU"RE HERE.... remember that the studio is offering 30% off Sizzix Dies this week INCLUDING TIM HOLTZ ALTERATIONS dies, edgers, movers and shapers, embossing folders, etc etc. There are some other cool tools on sale this week too!! So if your itching for some Sizzix goodness -- come on by!!

I had lots of fun Vintage Shopping with Sheri this weekend too!! I can't wait to show you what I've been up to but that's for another post!!
Happy Creating!!!!!